
Create a Process
You can choose to follow our example or create your own process. We will use a business neutral example for simplicity and clarity.
Step 1: Click on Process Workspace  in the Build Menu and the WorkSpace will open.
Tour the Workspace using the screen shot below:
Column 1 will show you all processes that are ‘under construction’, shared by your team, and held at the company level. Column 2 is the column where you will build and edit processes using the Drag & Drop Icons.
Navigation: Column 1: Column 2:

Step 2: Click on 
 Step 3: A form will appear to name and describe your process. Complete the requested information.
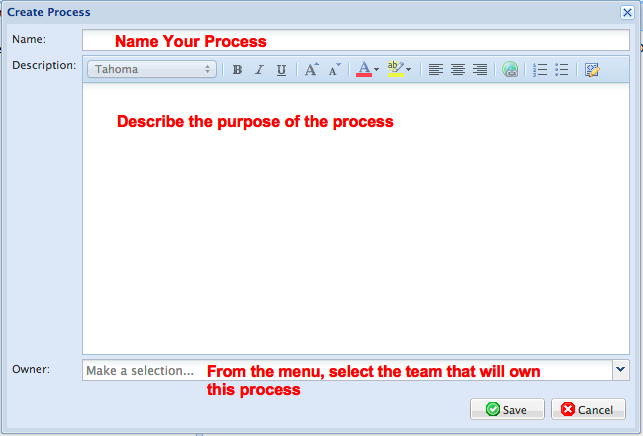
Step 4: Click ‘Save’
Step 5: Click ‘OK’
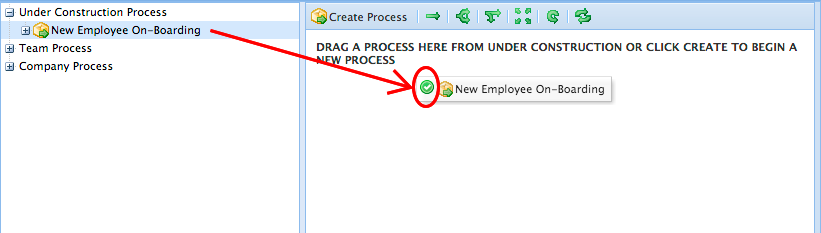
Once you have completed this form and saved it, the name of the process will appear ‘Under Construction’. Our example is:

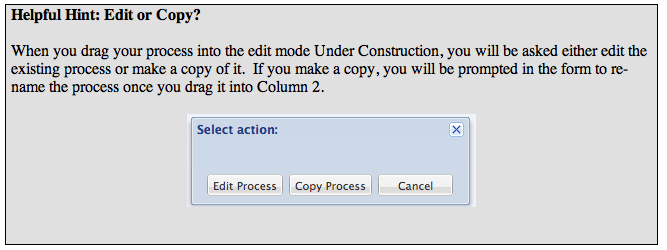
Step 6: Click on the process Name listed "Under Construction" and hold the cursor down while you drag it over into Column 2. When you see the GREEN check appear, you can release the cursor and the process has been successfully moved into the workspace to be built.
Step 7: The form will re-appear and Column 2 will clear to begin designing your process.
CREATE A SIMPLE PROCESS
Follow our sample, or build your own process using similar tasks.

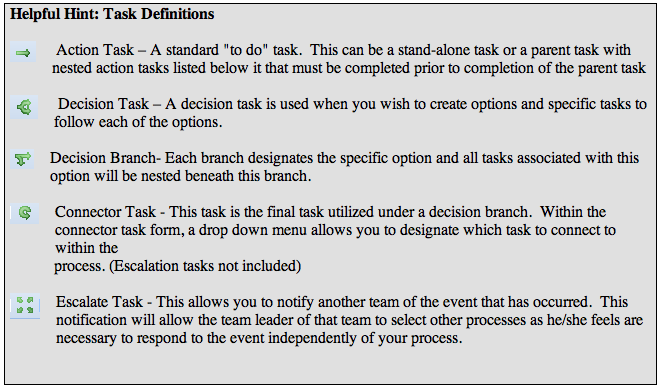
ACTION TASK 
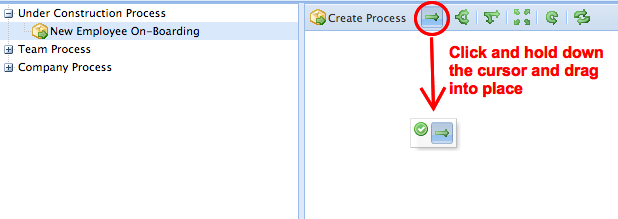
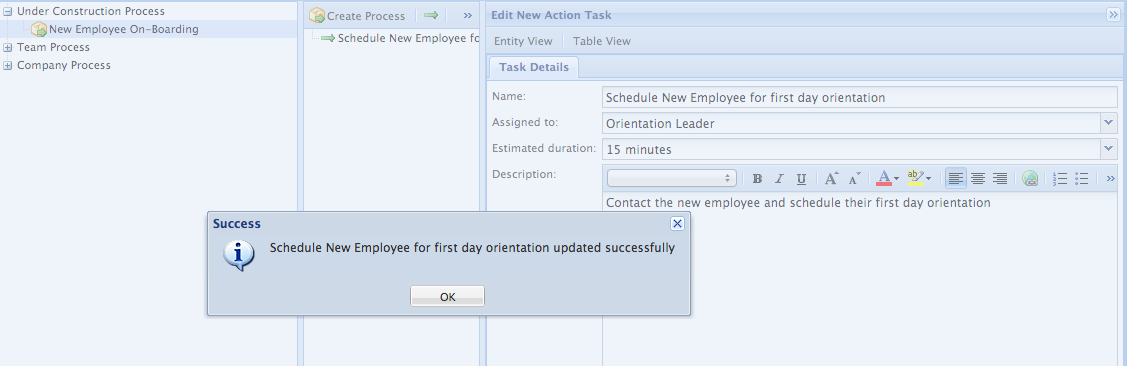
Step 1: The first task we are selecting is the Action Task. This is your first task so it will settle at the top of the workspace. When you drag a task into the work space, a form will open in a new Column, Column 3.
Step 2: Fill in the form associated with the action task that appears in Column 3.
When creating task details, you are naming the task, assigning it to the role that will be responsible for completing the task, the amount of time you anticipate it should take to complete the task, and providing as much detail as necessary for the strake/IR user to perform the task.

Step 3: Though we have not added any documents to our document library yet, we will show you how to attach a document for future reference. Knowledge Base Library is covered in under the BUILD section.
Once you uploaded documents into your Knowledge Base, they will appear in this ‘Available Column’.
You will click on the document title you wished to link to the task, click to arrow to move it over to the ‘Selected Column’.

Step 3: Click ‘Save’, or return to the task form by clicking the Task Details tab, and complete the rest of the form. Then Click ‘Save’.
You will receive confirmation that your task has been saved and it will appear in Column 2.
Step 4: Click ‘OK’
DECISION TASK 
Now we will build a decision into the process. We will start with the task that names the decision.
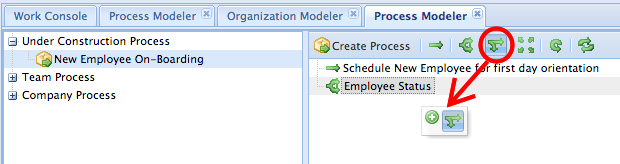
Step 1: First drag down a decision task .

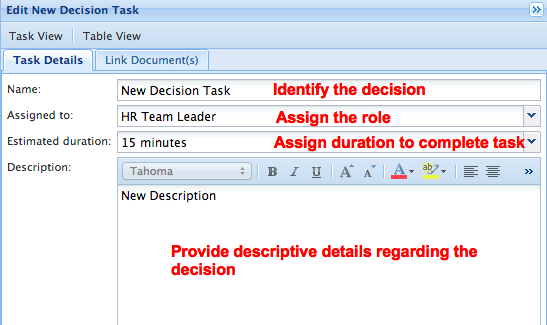
Step 2: A form will appear similar to the action task. The name of the decision task will notify the user of the topic of the decision.
Example: Employee Status
Step 3: Click ‘Save’
Step 4: Click ‘OK’
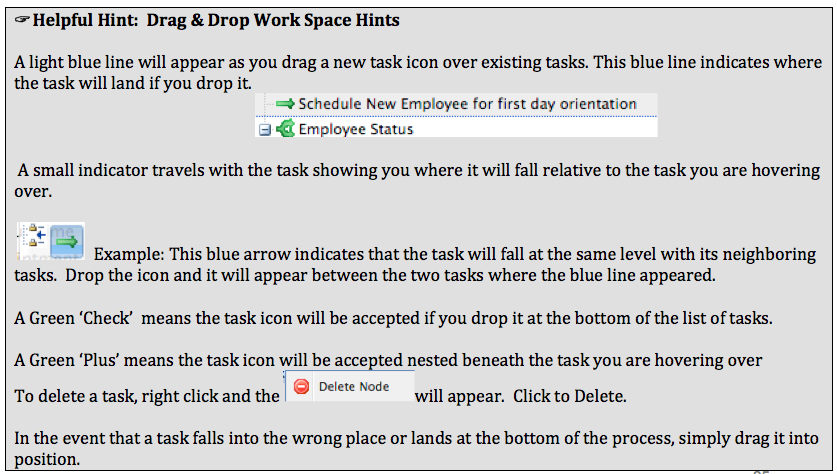
Now that you have dragged two tasks into the workspace, take a moment to look at helpful hints that will help as you move your icons around the workspace.
Return to building your process:
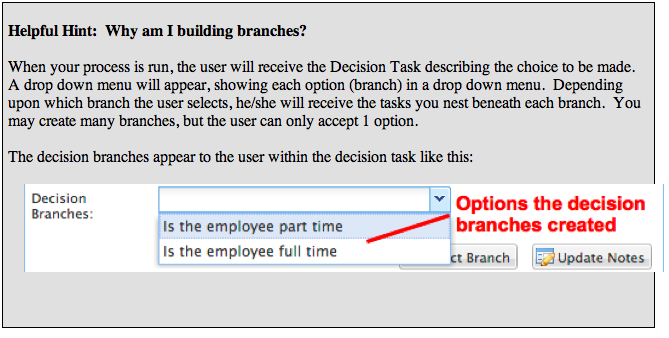
DECISION BRANCH 
Step 5: Drag the decision branches below the decision task and release when the Green + appears.
Example: We will build two decision branches – Full Time Employee and Part Time Employee because this portion of the process will vary depending upon what the status of the new employee is.
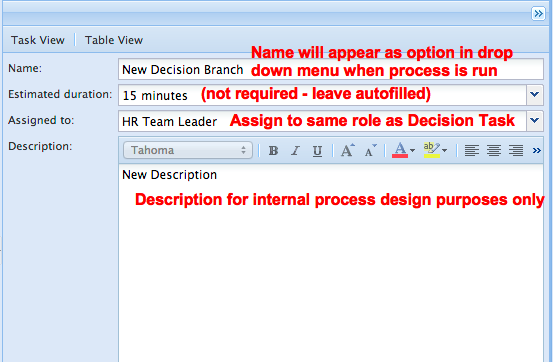
Step 6: Complete the form that appears with the first decision branch task.
Step 7: Click ‘Save’
Step 8: Click ‘OK’
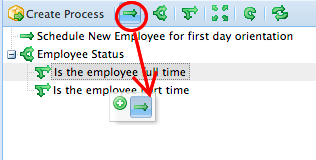
Step 9: Nest associated tasks beneath each decision branch by dragging the tasks over the branch you wish to assign them to and drop when the GREEN + appears.
Example: Here we are nesting an action task beneath the first branch ‘Is the employee full time’.
After each task form is completed, click ‘Save’ and click ‘OK’.
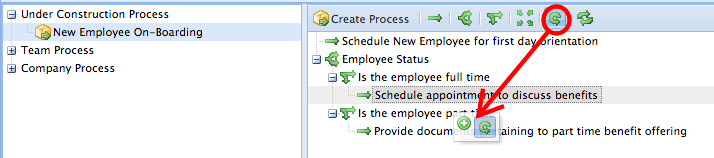
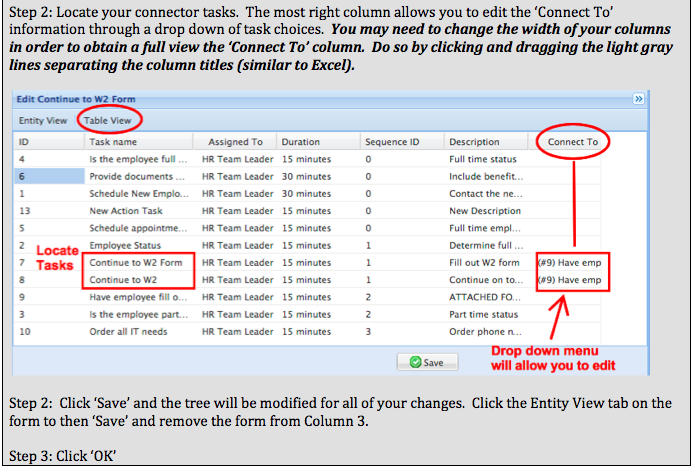
CONNECTOR TASK 
Step 10: After completing all of your action tasks within each branch, drag down a connector task. Hover over the decision branch and when you receive the GREEN +, drop the connector task. It should land directly below the last task. (DO NOT NEST CONNECTOR).
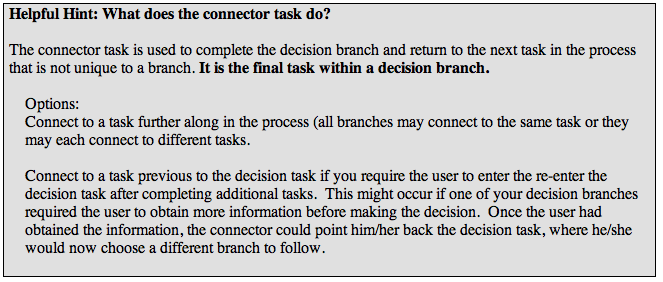
Step 11: Fill out the form. Note: The ‘Connect To’ drop down menu will offer you every task that has been created to date. If the task you are planning to connect to has not been created yet, select any task temporarily. Return to edit the connector after you have created the task you would like to connect to.
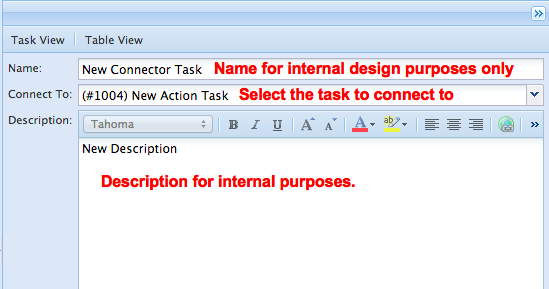
Step 12: Click ‘Save’
Step 13: Click ‘OK’
Step 14. Add one more action task and we will show you how to edit your connector to that task.
EDIT A CONNECTOR TASK
Step 1: Click on the connector task in the tree that you wish to edit. The form will open.
Example: We created an action task ‘Have employee fill out W2 Form’ to connect both branches to.
Step 2: From the drop down menu, select the new task you wish to connect to.

Step 3: Click ‘Save’
Step 4: Click ‘OK’
ESCALATE TASK 
Add an escalation task within your process when you wish to notify another department of the unique event or ‘episode’ that you are working on.
Example: We will notify the finance department of the new hire for payroll purposes.
Step 1: Drag the escalation task into the workspace.

Step 2: Fill out the form. At present you must specify in the description or name, what team(s) should receive the escalation.

Step 3: Click on the Escalate Details (THIS IS FUTURE FUNCTIONALITY UNDER CONSTRUCTION)....you can pre-select who will receive the notification here... but at present, the user receiving this task must select the teams you want to escalate to from a drop down menu.

Step 4: Click ‘Save’
Step 5: Click ‘OK’
Now that you have built a simple process, take a moment to review some of the strake/IR process logic:
strake/IR Rules
Tasks will be completed in the sequential order they are created.
If you nest tasks (child task) underneath another task (parent task) they will appear in the user's work console with a notation (subtask) and must be completed prior to the parent. For best practice, do not nest additional tasks underneath a child task or the distribution of tasks to our users can become complex, though possible.
The connector task must be in a direct sequence below an action task and connect to another action task.
A group of tasks can be designed to be completed in parallel by selecting identical sequence numbers in the table view or right clicking the task icons. All of these parallel tasks must be completed (in any order) before the next task in sequencial order can be delivered.
The escalation task must be used to escalate to another team that has not been previously invited to the event.
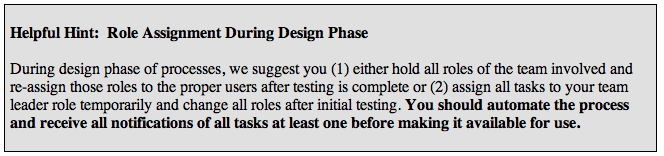
For ease in testing your processes during design, assign all roles to yourself. Then re-assign upon completion.
Now that you have finished designing your process, we can move it out of the edit mode “Under Construction “
Step 1: Right Click on the name of the process in Column 2
Step 2: Click ‘LIVE’ and the process will move to your Team Library.

PARALLEL TASKS
Each task is assigned a sequence number and tasks are delivered in to order you build them, by those automatically assigned sequence numbers. If you would like a series of tasks to be delivered simultaneously, and to be completed in any order, you can assign the SAME sequence number to each task. Once the group of tasks are completed, the next task in order will be delivered.
STEP 1: View your tasks in table view to identify the sequence numbers and utilize the drop down menu to make all desired parallel tasks the same sequence number.

Option: You may also right click on the task icon to edit sequence numbers.
EDIT YOUR PROCESS
Step 1: To further edit this process, drag it back to Under Construction

Step 2: Drag your process into Column 2.

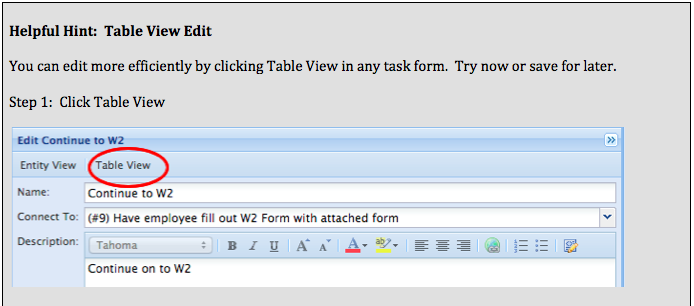
Step 3: The process will appear in Column 2 with the process form open in Column 3. To edit within the table format, click the 'Table View' option on the form. Or click any task and the specific task form will appear for edit.
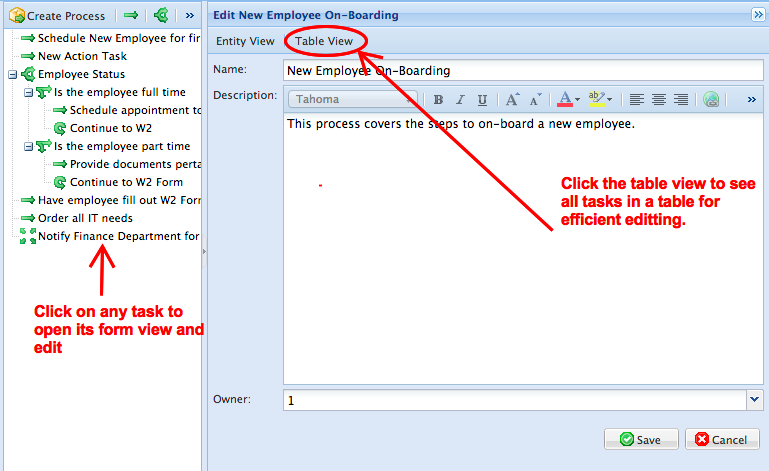
Step 4: The table format will appear in Colum 3. Click on any element of the task and edit the details.
In this example, the “Assigned To” is being edited. Once you have tested your process, this will be a convenient method to remove your team leader role from each task assignment and re-assign tasks to roles that should be involved in the process.

This example illustrates modifying duration times through the drop down menu in the table view.

Step 5: After making edits, click ‘Save’ and you will see the changes appear in Column 2.
Step 6: Right click the name of the process in Column 1 and select LIVE to move it back to your team’s library.
Comments